CLICK HERE FOR FREE BLOGGER TEMPLATES, LINK BUTTONS AND MORE! »

Friday, April 30, 2010

Recipe of the Week: Chicken Lettuce Wraps (gluten free)

One of my favorite dishes of all time are PF Chang's lettuce wraps. We order them every time we go there. I thought it would be fun to try and find a recipe that came as close as possible to replicating the appearance and more importantly the taste of PF Chang's signature appetizer. So was I ever thrilled, to go no further than the internet to find this wonderful recipe on http://www.recipezaar.com/. This recipe is as close as I'll probably ever find to matching the original. Do they taste JUST like PF Chang's? No...but they are very close and they are FABULOUS. I served these for dinner tonight along with a fruit salad. We each ate 2 along with the fruit and all agreed that it was not enough food for dinner. They are in fact, an appetizer...so this was not actually surprising. Next time I will prepare another chinese dish to accompany the lettuce wraps to make a more well rounded meal.

Here is what you will need:


1 T. vegetable oil
1 pound ground chicken
1 cup water chestnuts
2/3 cup mushrooms (whichever type you prefer..I used cremini)
3 T chopped onion (I use frozen chopped onions)
1 t. minced or crushed garlic
4-6 leaves of iceberg lettuce

SPECIAL SAUCE

3T. sugar
1/2 cup water
2 T soy sauce
2 T ketchup
1 T lemon juice
1/8 t. sesame oil
1 T hot mustard
2 t  HOT water
1-2 teaspons garlic and red chile paste or sauce

STIR FRY SAUCE

2 T soy sauce
2 T brown sugar
1/2 t. rice wine vinegar

DIRECTIONS:

Make the special sauce by first dissolving the sugar in water in a small bowl. Add soy sauce, rice wine vinegar, ketchup, lemon juice and sesame oil.

Measure the hot water into a small bowl. Measure out the hot mustard and stir into the water.

Next add a 1/2 t. of the watered down mustard to your special sauce and stir.
Then add a 1/2 t. of the garlic chili sauce to the special sauce and stir.
Do a taste test to determine if you want your sauce spicier or if it is just right. If you want it hotter, add another 1/2 t. each of the watered down mustard and the garlic chili sauce. Keep adding 1/2 t. at a time until you find the desired temp of the sauce for you. I used 1 t. of the watered down mustard and 1 t. of the garlic chili sauce to create a mild to medium spicy sauce. Once you have found your desired lever of heat, cover the special sauce and refrigerate until ready to serve.

Prepare the stir fry sauce by mixing the soy sauce, brown sugar and rice vinegar together in a small bowl.
Set aside.
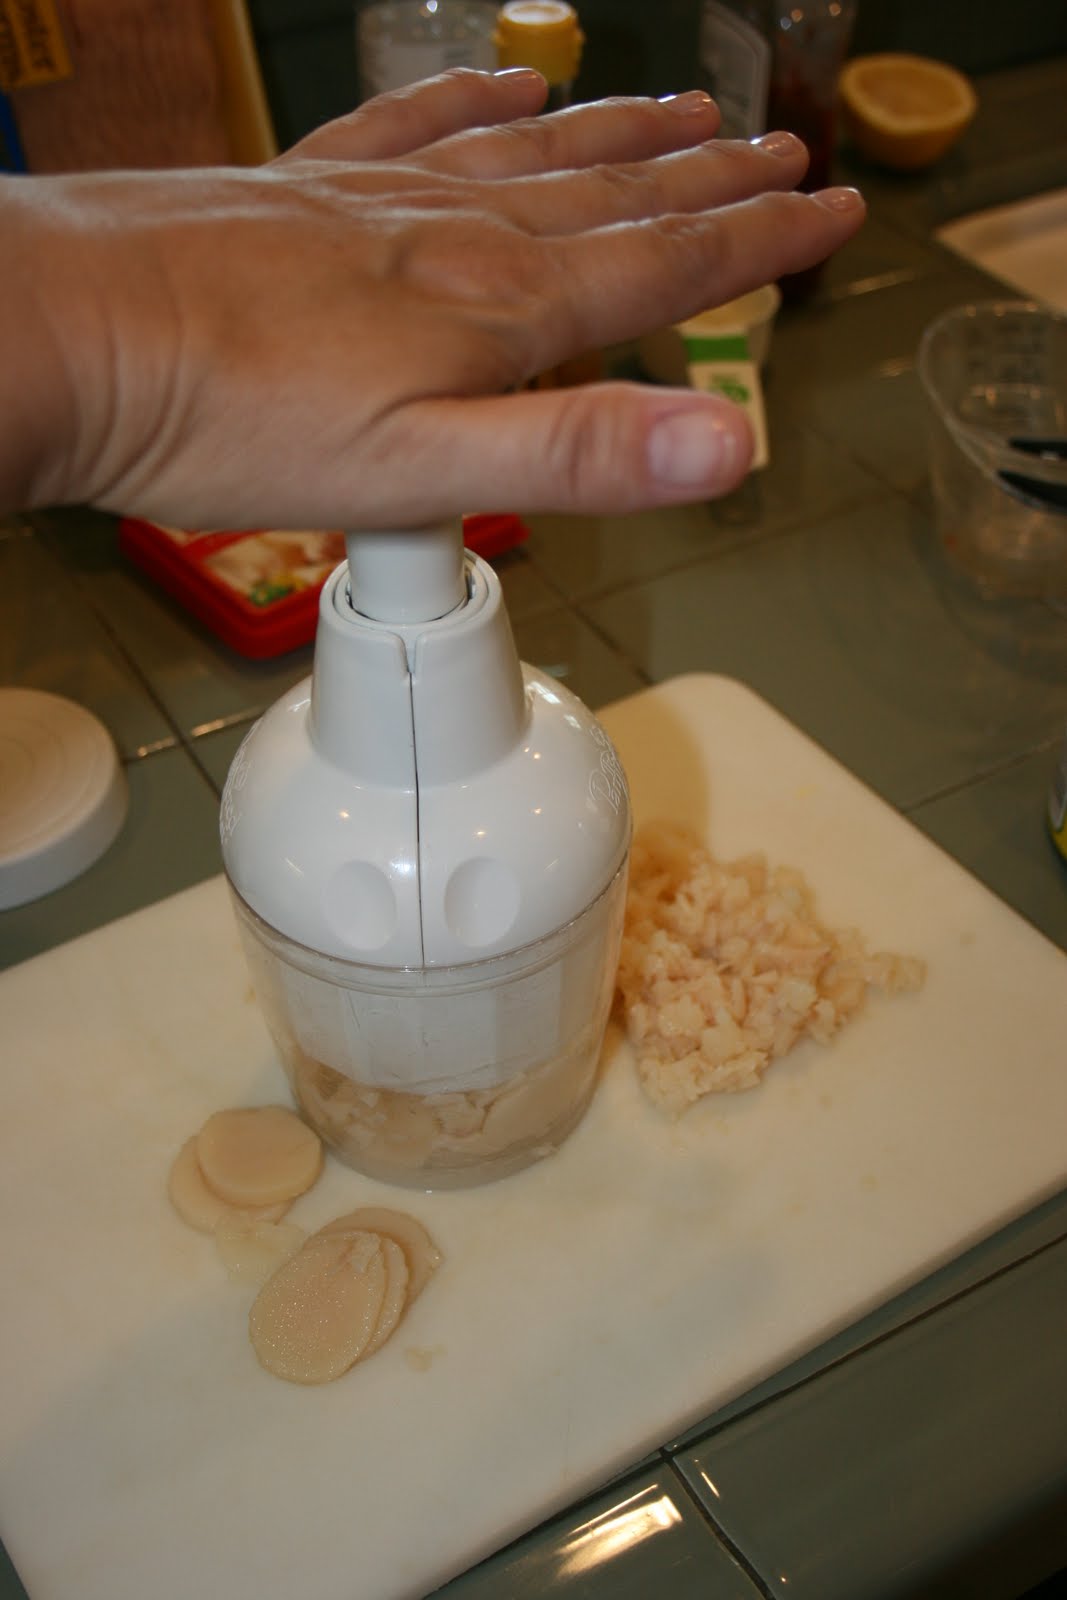
Next,  finely chop the water chestnuts and the mushrooms. I use a hand chopper which works GREAT for this. I got my chopper from Pampered Chef, but I've seen them at Target and other stores now. If you have a food process , mini electric chopper you can use these as well. You can even do this with a knife, but it will be more time consuming.

Sometimes I like to do the prep work for making dinner in the morning, and I did this for these lettuce wraps.
I stored the vegies and sauces in these great Pampered Chef  Prep bowls with lids. I kept them stored in the refrigerator until I was ready to finish making the meal in the evening.
Next, prepare the "lettuce cups". Take a head of iceburg lettuce and cut the bottom stem off.
Carefully de-construct the head of lettuce, removing the leaves one at a time. This was a little bit challenging to be honest, and some of the leaves tore a little as I was removing them from the head. They still worked well as lettuce cups, so if this happens to you, don't be concerned.
Once you have removed 4-6 leaves, carefully wash each leave and pat dry with paper towel. Stack the lettuce cups on a plate, cover loosely with plastic wrap and store in fridge until ready.
The final step is to cook the meat and prepare the filling. Pour 1 T. of the vegy oil into the bottom of a large skillet. Crumble the ground chicken into the pan and brown the meat. When meat is almost completely cooked through, I like to take a potato masher and mash the meat into small crumbles.
Next, push some of the meat over to one side of the pan and add one T of vegetable oil to the pan. Add the onion and garlic and stir around in the oil over medium heat for a minute or two.

Next stir in the water chestnuts, mushrooms and STIR-FRY sauce. (continue to reserve the SPECIAL SAUCE)
Stir all ingrediants well to combine and to coat the meat and vegies with the stir fry sauce. Continue to stir-fry the ingredints for another 2-3 minutes. Transfer the filling to a serving bowl.
Set out the filling, lettuce cups and special sauce for preparing the lettuce wraps.
Spoon desired amount of filling into a lettuce cup and drizzle with desired amount of the special sauce. Fold the lettuce cup like a taco and EAT!
If you have never had the pleasure of eating a lettuce wrap, you must try it. The hot and tangy filling, drizzled with the slightly spicy asian special sauce all wrapped up in a cool, crunchy lettuce cup is simpy divine!
I dare you to eat just one!
ENJOY!

Monday, April 19, 2010

Recipe of the Week: Pasta Salad (gluten free)

Well I didn't get the recipe of the week in yesterday, so techincally I missed a week. I hope this recipe makes up for my tardiness however! Several years ago while living in Las Vegas, I fell and injured my shoulder. I was in an arm sling for a week and had a hard time doing much of anything, much less cooking. It wasn't long before word of the situation got back to my church and soon we had meals coming every other night for a week. One night a sweet lady brought us a simple dinner of pasta and fruit salad with a loaf of crusty french bread. It was one of the BEST meals! Simple, healthy and delicious. I never got the opportunity to get the recipe from her...but her pasta salad was the best we had ever had. After my shoulder healed I attempted to "re create" the pasta salad and was jubilant when my efforts turned out almost exactly like what she had made us. This is one of those, "a pinch of this and a pinch of that" type of salads. There really isn't any exact measurements, you just throw it together!

Here is what you will need:
1 bag or box of rotelle pasta ( or use gfree corn spiral pasta at Trader Joes, or gfree pasta of choice)
1 package of Good Seasons Italian dressing (vinegar, oil and water as called for on the package)
grape tomatoes
cheddar cheese
salami
sliced black olives
*Morton Natures Season's seasoning blend

The first step is to follow the directions on the Italian dressing packet and make the dressing. I highly recommend buying the little glass cruette jar starter set. It gives you the measurements on the side of the cruette and makes dressing making super easy. Refrigerate dressing for several hours or overnight.
Next, follow directions on the rotelle pasta and boil and drain your noodles. I then stir in about 2 T of vegy oil to keep the noodles from sticking and put them in the fridge for several hours or even over night to chill the noodles. Cut desired amount of cheddar cheese and salami into small cubes and add to the chilled noodles. Add desired amount of grape tomatoes and olives. Stir to incorporate all the ingrediants. Sprinkle lightly with the seasoning blend. Be careful not to overseason! The last step is to pour on the dressing. Just wing it here...you want enough dressing to generously coat all the ingrediants but you don't want it drowning in dressing either. I've noticed if I make this salad in the morning for an afternoon BBQ, that I typically have to add a little more dressing right before serving it as the pasta has absorbed some of the dressing. 
This goes great with any type of BBQ'ed meat, sandwiches or even as a meal when served with fruit. ENJOY!

*I've discovered whole wheat pasta. It is much healthier than white pasta and it is loaded with protein. If you are making this salad as a stand alone meal the protein will help fill you up! As far as taste is concerned, you can not tell any difference between whole wheat and white pasta. If my picky eater Kate doesn't notice a difference, then trust me there isn't any!*

Sunday, April 11, 2010

Recipe of the Week: Chicken Pot Pie

This week's recipe is based loosely on a recipe from my friend Beverly. I made a few changes to the original recipe however and love the results. We just got up from the table as this was our dinner tonight and I can tell you this...my tummy is smiling! One thing to note about this pot pie is that in order to make it like mine...you need a DEEP dish pie pan. I actually use a Pampered Chef Deep Dish Baker which is even deeper than a deep dish pie pan. If you have access to a Pampered Chef rep, I highly recommend getting a deep dish baker. I use mine all the time and it is the PERFECT dish for this pot pie.

Here is what you need:


1 pound boneless chicken breasts
Pillsbury Pie Crusts (as pictured above, let sit at room temperature 20 minutes before using)
2/3 c. flour
6 T. butter
1/2 t. pepper
2 2/3 c.  boiling water
1 1/3 c. milk
6 chicken boullioun cubes (I use Wylers low sodium cubes)
3 cups mixed frozen vegies (I use a combo of brocolli florets and a mixed vegetable medley that has corn, green beans, peas and carrots)
1 russet potato

The very first step is to boil the water and drop the boullion cubes into the boiling water so they can dissolve. Set aside.
Next, prick holes into the potato and cook in microwave until fork tender. (microwaves vary, mine took 5 minutes for a large russet potato)
Set the hot potato aside and let cool.

Next, poach your chicken breasts to cook them. Bring approximately 6 cups of water to boil in a large sauce pan. Drop the chicken breasts into the boiling water and let poach in  gently boiling water for 20 minutes.
When done, remove breasts from hot water and set aside to cool.

Next, measure out desired amount of brocolli florets and mixed vegy medley to total 3 cups of frozen vegies.
Set aside so vegies can begin to defrost. 

Next, prepare your deep dish pie pan. Open your box of pie crusts and take out one of the rolled up pie crusts. Un roll and press into the pie pan.


Depending on how deep your pan is, you may have to carefully pull and press up the sides. When you are done it should look like this:

Set aside.

If your potato is cool enough to handle, peel and cut into small cubes. Additionally, cut the chicken breasts in cubes. Set both aside.

You are now ready to start preparing the filling. First, melt the butter in a large sauce pan.


Stir in the flour and pepper, creating a rue.


Next, add the milk and water/boullion cube mixture. Don't worry if all the cubes have not dissolved, they will finish disolving as you cook the sauce. Whisk over low heat until smooth.

Continue to cook over very low heat until sauce thickens and all the boullion cubes are completely dissolved. You will have a thick, creamy sauce as can be seen below.
Next, add the partially defrosted vegies that you have pre-measured to the sauce. Stir until the vegies have completely defrosted (takes only a few minutes) Remember to keep your heat on low so you don't burn the sauce.
Once vegies are defrosted, turn off the heat. Next, add chicken.


Lastly, gently fold in the cubed potato. Stir all well to incorporate. Carefully pour the filling into your prepared pie plate as shown below.

Set aside momentarily as you prepare your top crust. Unroll the 2nd crust that comes in your pie crusts box. On a lightly floured board, and with a lightly floured rolling pin; roll the crust from the center out until the round crust increases in size by approx. 1/2 inch in diameter. (you need it large enough to fit on top of your deep dish pie plate) Carefully pick up the crust and lie on top of the filling so that the crust falls over the side by 1/4-1/2 inch.
Tuck the crust under all the way around until your pot pie looks like the below image.
Lastly, if you know how to...crimp the edges.
If you don't know how to crimp, you can watch a u-tube tutorial which will teach you how...OR you can do a fork flute, by just taking a fork and pressing it into the crust, all the way around the edge.

Taking a small sharp knife, cut 3 small slits in the middle of your pie so that steam can escape while baking. Bake in a 350 degree oven for 35-40 minutes or until the crust is a nice golden brown. When you remove your pie from the oven, it should look like the picture below:
This pot pie is SO yummy. The crust is light and flaky and the filling is creamy, hearty and delicious. I like to serve this with a spinach or fruit salad.
                                                            ENJOY!!!

Stamp Club lovelies

I had another wonderful evening at Stamp Club this past Thursday night. I can always count on Julie to provide us with some really innovative projects. This time we made some flowers out of paper and it was really fun! The flower below is made using an eyelit punch along strips of white paper and then running them through the paper crimper a few times. This makes the paper really flexible, almost like fabric. Next you take a piece of double stick paper and coil the strips around while sticking the flower to the sticky paper. We put a big button brad in the center and then cut the leaves out by hand, running them diagonally through the paper crimper to give the leaves the appearance having veins. Lastly we made a little basket to put a cello bag with candy or a small candy bar or treat. I love these flowers and plan on making smaller ones for scrap book pages and cards.
Here is another fun flower we made. This time we took card stock and punched out flowers (big fancy flower punch in current Stampin Up! mini catalog) We then took a spray bottle of water and wet each flower. After wetting the flowers we scrunched them up and then opened to reveal a wrinkled flower. Next, we stacked the flowers on top of each other and secured with a brad. Lastly we brought each flower layer up to meet each other and then fanned out. I plan on doing a picture tutorial on these flowers soon. The picture does not begin to show how CUTE these flowers are. I love them! We also scored paper and made the little box that we adheared the flower to.
Above is a card that we stamped. We have used this new clear stamp set before. Below is the card I made
for our swap. It says "Things I love" SHOPPING, CHOCOLATE, NEW SHOES. Then inside the sentiment is BUT MOST OF ALL...YOU! I just love this stamp set!
Posted by Picasa

Sunday, April 4, 2010

Recipe of the Week: Tropical Chicken Salad on Croissants

This year for Easter dinner I decided to keep it ultra casual. With it only being the three of us I decided against making a big ham dinner. In discussing what we would do instead, Kevin and I decided that it would be nice to pack a picnic and have an early dinner at one of the beautiful parks at a nearby winery. So when planning the meal, a picnic was first and foremost on my mind. Yesterday I went to Trader Joes and stocked up on everything I needed to prepare the picnic faire. However when watching the weather report late last night I saw that it called for the temps to be in the mid 60's and overcast...not the best weather for a picnic; so our picnic at the park became a picnic in our family room. Seriously....we all sat indian style around the coffee table and had our Easter "picnic" dinner. I LOVE these sandwiches. The recipe was given to me by Lisa P. who is an old neighbor from Roseville. I love making these in the spring and summer. The cool, bursting with flavor chicken salad on the buttery, flaky croissant is a marriage made in sandwich heaven.

Here is what you will need:


2 c. chopped cooked chicken
1 8 oz. can drained pineapple chunks
1/3 c. celery, chopped fine
1/3 c. mayonaise
1/4 c. toasted almonds, sliced
2 T. chopped green onion
1/2 t. garlic powder
1 11 oz can drained mandarin oranges
4-8 butter croissants

(the above salad recipe generously fills 8 croissant sandwiches..I cut the recipe in 1/2 and it yielded 4 croissant sandwiches)
Up until recently, whenever a recipe called for "cooked chicken" I would poach it. However the other day while watching The Barefoot Contessa on The Food Network, she stated that roasting/baking the chicken for chicken salads gave the salad so much more flavor. Boy was she right. I noticed a huge difference in the flavor of this salad by simpling roasting/baking the chicken vs poaching it.

Wash and pat dry 2 large chicken breasts or 4 small. (1 large breast yields 1 cup of cooked chopped chicken)  Place in a casserole dish that has been sprayed with non stick spray. Sprinkle with salt and pepper. Bake at 350 for 30 minutes. Cool and chop into small cubes.


Finely chop the celery and green onions. Cut the pineapple chunks and mandarin oranges into smaller, bite size pieces. Add to the chicken.

Sprinkle with the garlic powder and almonds and  gently fold in the mayonaise until all is combined.

Next, slice croissants in 1/2 and fill with the salad.
Add a piece of romaine lettuce, cut in 1/2 and serve.
Enjoy!