CLICK HERE FOR FREE BLOGGER TEMPLATES, LINK BUTTONS AND MORE! »

Monday, February 13, 2012

Valentine's stamp projects and home decor

When we moved to our new city back in July I started looking for a Stampin Up! or Close to my Heart representative. Since I've been in clubs through both companies and love the stamps, paper and crafting accessories from both companies, I was open to either. My goal was to join a card or scrap book club so that I could meet new friends and have fun making new projects too.  I literally could not find any reps for either company in my city. I pretty much gave up on the idea when in December at my church Women's dinner and boutique I met Krista J with Stampin Up! She was there selling many fun Christmas gifts she had made and of course to advertise her business. I knew within a few moments of meeting Krista that I had met someone really special. I was so excited to get started stamping with her. I joined a scrap book club that meets at her house one Friday a month. We make two lay outs that she has pre-designed and cut the paper for. She also has frequent classes and I recently attended her Valentine's craft class as well. Krista is SUPER creative and buys a ton of the newest products to share and work with so it's a special treat to attend her classes and club. Below is what I made at the Valentine Craft Class.


This darling "cup" can be used to hold pencils or candy or whatever else you can think of. It is now sitting on my desk full of pencils and pens.
                                       Here is a valentine card I made.
                                          I love the dimensional heart.


This hanging 3-D project was my favorite thing that we made. We started with making the large "rosette" using a scoring board and then assembled the rest using several die cut hearts etc. I think it looks great hanging on the door in our home.


Below is a Valentine themed scrap book layout that I did at scrap book club this past week. Additionally we made a winter themed layout that I will show in a separate post.  


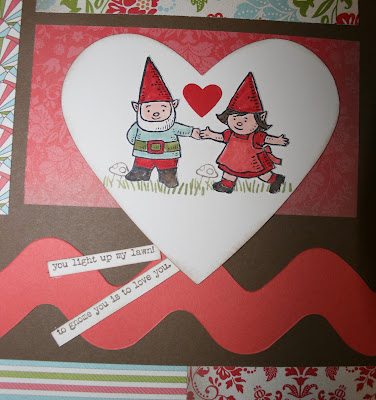
I love the whimsical nature of this layout. We used these darling stamps with gnomes! This layout will be perfect for some pictures from one of Kate's valentine parties as an elementary school student.


I love the little "gnome" sayings like, "to gnome you is to love you".  I will show these pages again once I get the pictures on them.

 Valentine's Day is such a fun holiday. Those who know me well know that I am totally in LOVE with love and romance. So naturally I'm one that decorates for this holiday. My iron corner standing shelf unit is the best place to display my decorations.


I made the piece of art in the frame a few years back using scrap book paper, stickers and accessories. The angel is from my willow creek angel collection that is out all year round and the heart was made by my Mom.

I made these "be mine" blocks several years back from a kit I purchased at a scrap book store in Las Vegas.

                                      The book and tin were gifts from my Mom years ago.


                                            These heart shaped boxes were made by my Mom.


The love hanging was purchased at Michael's a few years ago.
I made all the heart ornaments on this little "Valentine tree"  several years ago as well.

May you and yours have a very happy Valentine's Day. May it be spent with someone you love!
Posted by Picasa

Recipe: Mahi Mahi Tacos (gluten free)

Going forward, all of the recipes I post will be gluten free. However, in most recipes I will give a non-gluten free version of the recipe for those who are not gluten free. I have been gluten free for a year now and Kyle has been gluten free for  over a month. (more on why we are gluten free in a future post)

These Mahi Mahi tacos are one of the easiest, most delicious recipes I have found recently. It comes from a Weight Watcher's magazine and the total point value for 2 tacos is 4 points. One of the things I LOVE about Mahi Mahi is that it is an odorless, mild fish and although I'm not a big fan of fish in general...I love Mahi Mahi. If you don't have access to Mahi Mahi you can use any white fish of your choice....such as grouper, tilapia, cod or halibut.

Here is what you will need:


1/2 cup reduced-fat sour cream
2 limes: 2 T fresh lime juice (the juice of one lime)
1 lime to cut in wedges and serve with tacos
1/2 t. ground cumin
1/2 t. chili powder
1 t. Mrs. Dash salt-free Southwest chipotle seasoning
1/4 t. salt (optional)
4 (6-oz) Mahi Mahi filets (or other white fish of choice)*I buy frozen Mahi Mahi fillets from Trader Joes
1/4 c. gluten free flour blend (I use Bob's Red Mill All purpose baking flour) if you are ok with gluten than use all-purpose flour
2 T olive oil
8 corn tortillas
1 cup preshredded cabbage or iceberg lettuce
*salsa of choice for garnish*

Directions:

1. Combine first 4 ingredients in a small bowl; set aside in fridge.

2. Rinse fish fillets and pat dry with paper towel. Cut into strips as seen below.


Generously sprinkle Mrs. Dash seasoning on both sides of fish strips.
Coat each fish fillet in flour twice. Pat the flour in to fish.
Heat 2 T. of olive oil in large skillet. Fry prepared fish approx 4 min. on each side or until fish flakes easily with a fork. Remove filets to paper towel to absorb any extra oil.

Set your table with condiments for the tacos. ie: cabbage, salsa, lime wedges, cumin/chili powder sour cream sauce you prepared earlier, corn tortillas etc.. I like to serve these tacos with a side of spanish rice and black beans.

Prepare your taco. In a heated corn tortilla spread out 1 T of the sour cream sauce. Place a fish fillet in center of tortilla. Top with cabbage or lettuce and salsa and ENJOY!

Sunday, January 15, 2012

Christmas Brunch

I'm finally posting pictures from the Christmas Brunch I had for a few of the women from my bible study group. In mid December I invited all of the women from my bible study group over for brunch. Unfortunately, only four women were able to make it...but even with the small group we had a wonderful time!


I decided to keep it casual and set the table in the breakfast nook for the brunch. I used my snowman plates, a red runner and centerpiece of greenery, pine cones, berries, ornaments and candles.


Here are my "red" velvet cupcakes that I make every year. THIS year however I made the mistake of buying a regular chocolate cake mix instead of a German chocolate cake mix. The recipe was given to me by my friend Beverly J and it comes from a book called "The Cake Dr." Well I learned WHY it calls for a German chocolate cake mix. That cake mix is lighter in color so when you add the red food coloring your cupcakes turn red. A regular chocolate cake mix is too dark, so when you put the food coloring in the result is NOT red cupcakes but a sort of burgundy colored cupcake! Oh well, live and learn....they were still delicious.

In addition to the cup cakes, I made a breakfast casserole and a chessy hashbrown casserole. The girls brought the rest of the food. We enjoyed an assortment of breakfast breads and muffins, fruit salad, and a vegy tray.


                                                   I set up a coffee and tea station for the ladies.


                                          I made these ornaments as party favors for the girls.


                                                      ...and yes I made one for our tree too!


Here are the girls sitting at the table right before we ate. From left to right is Janine, Joanne, Karen and Irene.

I thought it would be fun to play some Christmas themed games. The first game was "Guess the Christmas Song" and Janine and Irene won. Here they are with their prizes.

                                  We also played "Christmas Pictionary". Here is Irene drawing.


                                               .....and Joanne drawing.....

                                                 .....a nutcracker!
                                          Below is my drawing. Everyone cracked up at my drawings. The word was
JESUS. First I drew the face and long "hair", but the girls thought the "hair" looked like rabbit ears! Finally when I drew the cross next to the "rabbit eared" Jesus. Someone guessed it was Jesus! They insisted I take this picture. It got quite a few laughs.


The final game was "Guess what's in the stocking". I took a very large stocking made of thin fabric. I put Christmas related items in the stocking such as an ornament,  pine cone etc.. and then asked the girls to guess what was in the stocking  by feeling the items through the fabric. Whoever guesses the most items within 90 seconds wins.

We had such a wonderful time of fellowship and fun at the brunch. The girls seemed to really have a great time and thanked me several times for putting it together.
 Here we all are on the stairs.

I feel so fortunate to have met these wonderful ladies!
Posted by Picasa

Sunday, January 1, 2012

You make me smile!

There was a significant void felt at our house this year at Christmas....our sweet Lily was not able to come along with Kate as it became really clear at Thanksgiving that Kyle is VERY allergic to her. So we followed the doctor's orders and Kate left Lilly back in her college city with a friend.

Here are a few pics of Lily (and Kate and Kyle) from her visit to see us at Thanksgiving. Going forward when we want to see Lily...we will have to go visit Kate to do so.

 Kate prepares to give Lily a bath
Isn't my Grand dog the cutest?


Lily LOVES her bath!
Drying off in front of the fire.

This pic was not posed...when I saw Kate and Lily lying in front of the fire together like this I just had to take a picture. Classic!


                                                       Acting Silly!

                                           Night night Lily!


                                                      I love this face!

Posted by PicasaYou make me smile!